Global Additional Pay Imports
How to use the Global Import feature to upload additional pay in Namely Payroll.
OVERVIEW
You can add additional pay to multiple employees across multiple pay cycles by using the Global Additional Pay Import tool in Namely Payroll. Use this tool for processing quarterly commissions, annual bonuses, retro pay, and more.
-
For information on how to add unlimited number of one-time additional payments to employees’ checks within a single pay cycle, see Importing Unlimited Additional Pays.
If this is the first time you’ve attempted to import additional pay, you’ll need to submit a case in the Help Community and request that the service team adds import functionality to any pay type codes you’ll be using.
Accessing The Additional Pay Tool
To access the additional pay tool, select Upload Additional Pay from the Payroll Center dropdown.
PREPARING YOUR IMPORT FILE
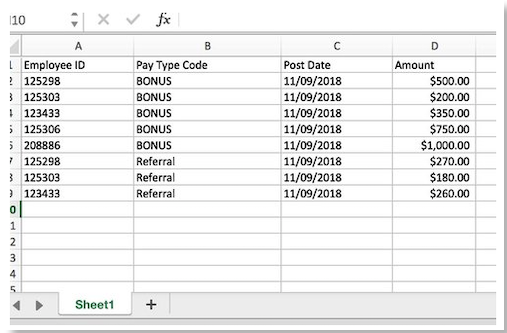
Click Upload Specifications to download a sample spreadsheet for your import. The upload file consists of four columns:
-
Unique Identifier: You can use one of three unique identifiers in your import file—Namely Employee ID, SSN, or Company Employee Number. You must use the same identifier type for all employees in your import.
-
Pay Type Code: If you do not have importable pay type codes set up for your organization, submit a case for assistance.
-
Note: Pay type codes are case-sensitive.
-
-
Post Date: The post date must occur between the start and end date of the pay period. The post date must be entered MM/DD/YYYY.
-
Pay Amount: Dollar amount of the employee’s additional pay.
Note: The tab name on your import spreadsheet must be titled Sheet1.
TIP:
The import tool is sensitive when it comes to data formatting. If you experience an error, we recommend copying your data and re-pasting it into your template as a Value, to ensure no lines of data were corrupted.
UPLOADING YOUR ADDITIONAL PAY FILE
To upload your additional pay file:
-
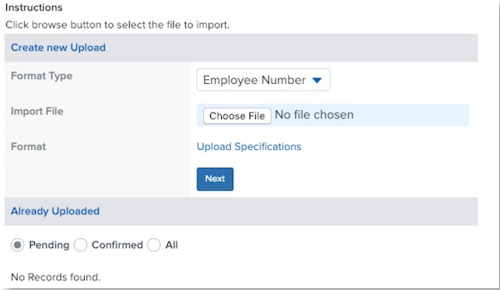
Select the unique identifier you’re using from the Format Type dropdown.
-
Click Choose File to upload your file.
-
Click Next.
-
Review the Status column to ensure all of your additional pay records were uploaded successfully.
-
Scroll down to the bottom of the screen and click Save & Validate.
-
If all records uploaded successfully, click Finish.
Common Errors That Can Result in an Unsuccessful Upload
-
The post date was not entered in the correct format (MM/DD/YYYY).
-
The pay type code does not exist.
-
The pay type code does not match. (Pay type codes are case-sensitive.)
-
The unique identifier was entered incorrectly.
-
The placement of the unique identifier column was not the first column.

TIP:
If you have more than one Pay Group included in the import, you will need to process one before opening and processing the next Pay Group. Not doing so will cause import issues since it's looking for the next pay cycle with a pending status.
Things to Consider
-
The Post Date must be less than or equal to the pay cycle's end date instead of the pay date. The post date must be entered in MM/DD/YYYY format.
-
Approved additional pay transactions will only pull into the pay cycle if the post date is less than or equal to the pay cycle's end date. If your post date is less than or equal to the end date of multiple open cycles, the additional pay upload will pull into the first cycle you calculate in Step 3.
UNAPPROVING ADDITIONAL PAY
To un-approve any additional pay you have uploaded:
-
Select Approve Additional Pay/Expense from the Payroll Center dropdown.
-
Select Approved & Ready for Payroll Processing.
-
Select the checkbox next to any record you want to unapprove.
-
Click Unapprove Selected.
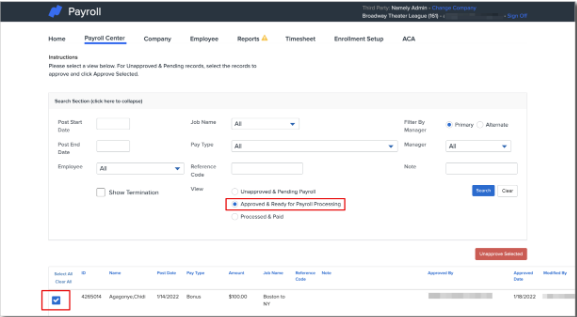
You can also Edit or Delete any unapproved pay records by selecting Unapproved and Pending Payroll.
REVIEWING PAY BEFORE PROCESSING PAYROLL
After your have uploaded your additional pay, you can view each employee’s specific payment records in Step 1 of payroll processing by hovering over the i information icon under the Additional Pay column.

Additionally, we recommend reviewing the Payroll Register and Preview Additional Pay/Expense reports in Step 3 of payroll processing to ensure all records have been uploaded correctly before submitting your payroll.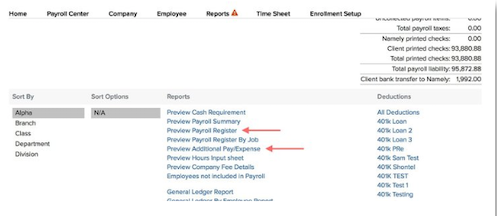
Zero Additional Pay
If you want to Zero any additional wages, you can do so in Step 1 of payroll by clicking the Zero Additional Wages and Pay icon and selecting Zero Additional Pay.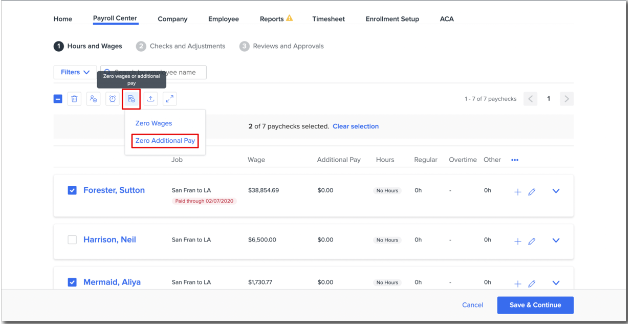
After clicking Confirm, review the new value in the Additional Pay column to ensure it reflects the desired amount.
TIP:
Even if employees are receiving $0.00 in additional pay as a result of zeroing out in Step 1, they will see the Additional Pay noted on their paycheck though they will not see an amount.
You may be interested in our enhanced service, Managed Payroll, which is designed to remove the burden associated with day-to-day payroll administration. Namely will handle payroll uploads, garnishment priority processing, dedicated payroll consultant, and more!
Email clientssales@namely.com to discuss service details and pricing.